xOpera SaaS

The Software as a Service edition of xOpera is available at saas-xopera.xlab.si/ui/.
It is a multi-user service offering all capabilities of the console-based opera, providing all of its
functionalities as a service of Web 3.0 where you can interact with it through the browser, or an API, if you so desire.
Please read the warnings at the bottom, as you accept some inherent risks when using xOpera SaaS.
GUI
Using the browser version is straightforward. Let’s go through the basic workflow, where you:
Have secrets you need to define prior to deployment.
Author a new workspace to contain your project.
Register your secrets to be available in the workspace.
Use the browser to create a new xOpera project from a CSAR.
Have to specify which service template and inputs you are using, then validate them.
In the end, deploy the project.
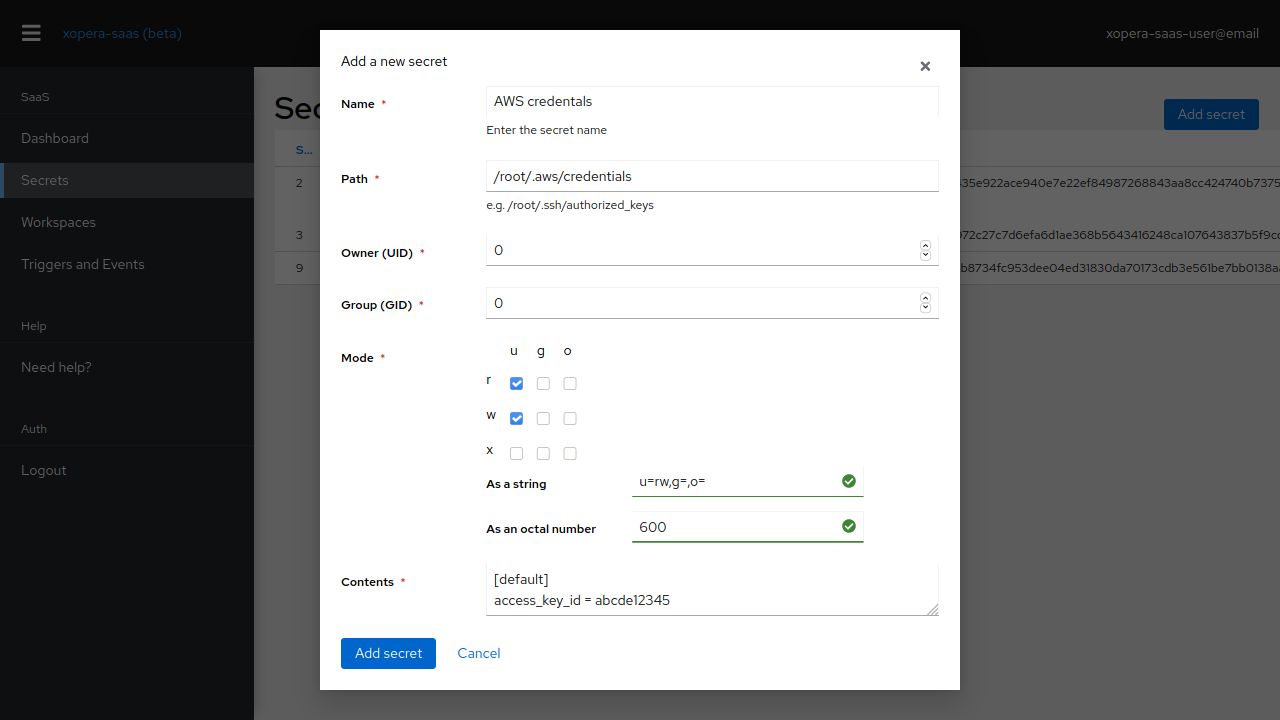
Fig. 3 The secret creation screen.
The first thing we need to do is create whatever secrets are necessary for your deployment to run. For example, these are your cloud provider secrets, SSH public keys, among others. The way they are provided is through files - with each secret, you declare a file (and contents) that will be present in your project when you create it.
Next, let’s create a workspace to contain our projects.

Fig. 4 Manage numerous workspaces directly from your browser.
Creating one is simple, you just need to choose a name. You are assigned owner privileges automatically, and you can share this workspace with other users, who can then also create projects in it. In Fig. 4, the DemoWorkspace projects is shared with us, which we can determine by looking at the Ownership column.
Sharing workspaces is done through the dropdown menu on the right, by clicking on the kebab icon. Sharing individual projects is not possible. To share a workspace with another user, use the email they used to sign in to xOpera SaaS. The user must have previously logged in to xOpera SaaS at least once.
The next thing we need to do is to assign the secrets we created in the previous step to this workspace. This is the only way they are applied to projects within this workspace. As with sharing workspaces, this is done through the dropdown on the right of each workspace’s row. When you apply a secret, this is reflected in the list of workspaces.
All that is left is to create and deploy a project. To do this, click the Add Project button, choose a name and select your CSAR file.
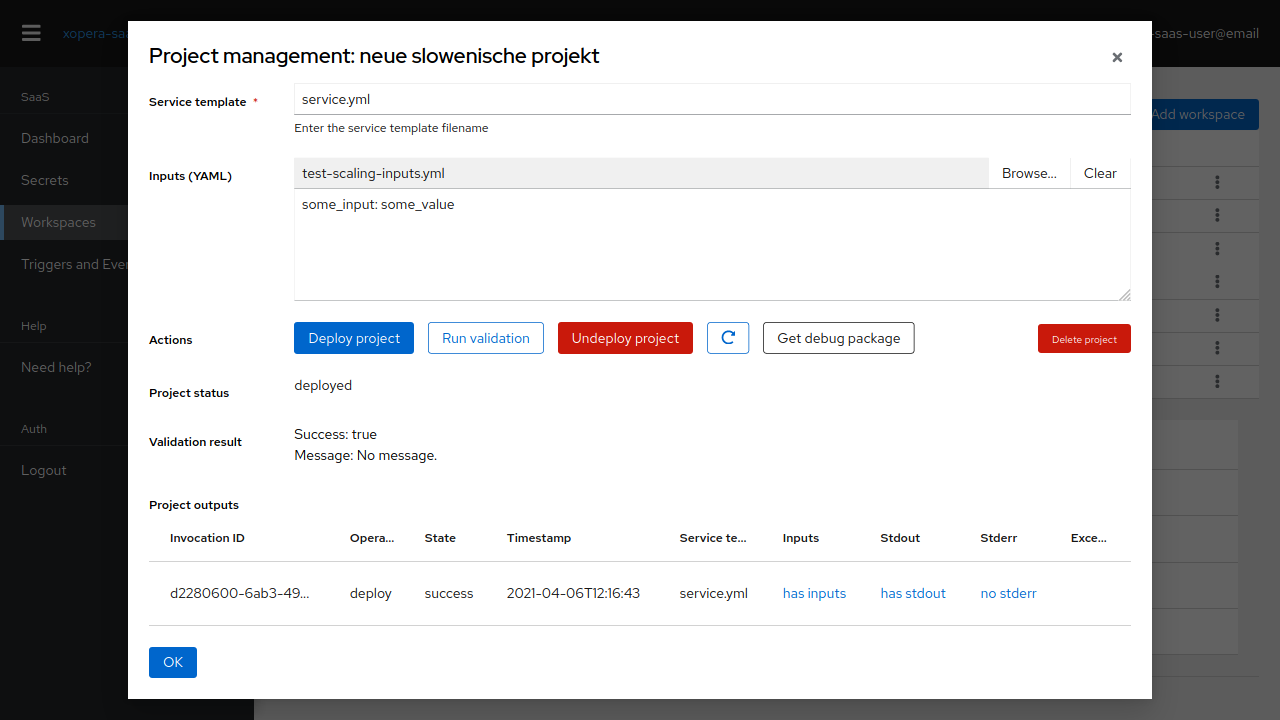
Fig. 5 The main xOpera SaaS project management screen.
To deploy the project, open the management window, input your service template filename and upload your inputs file using the Browse button. You can Run validation on the service template and inputs prior to deploying as a basic sanity check.
Each invocation (deployment, undeployment) has an entry in the list of invocations. The status and outputs are reported and updated to allow you to see the progress. In case of errors, you can:
Run validations.
Inspect the inputs, stdout and stderr.
Download a debug package.
The last option is the way to go if the deployment fails in an unexpected way. You will be served with an archive file containing the exact project structure xOpera SaaS uses for deployment, so you can attempt to reproduce (and hopefully, fix) the error locally.
To undeploy or delete the project, press the corresponding button.
In the following video we present the xOpera SaaS and show how to use it natively from GUI.
SaaS API
A preview of the API reference is presented in Fig. 6 and the whole reference is located at the SaaS API page.
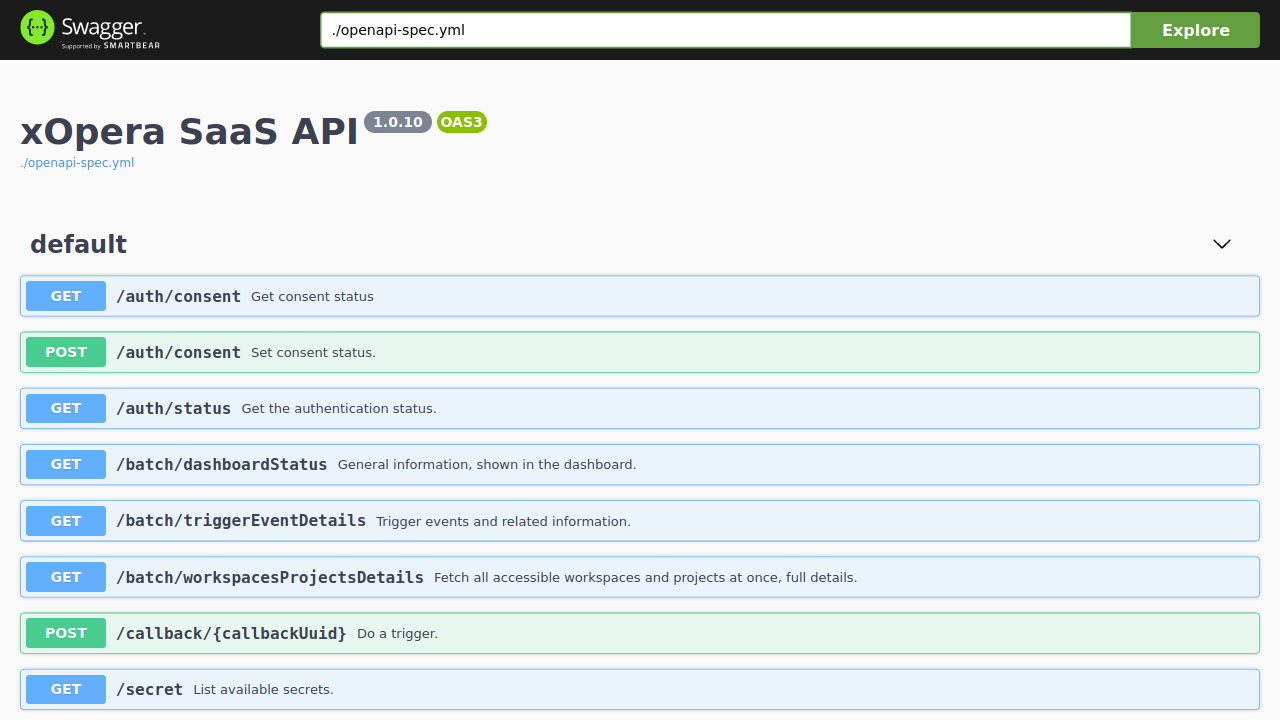
Fig. 6 An excerpt of the xOpera SaaS API.
The following code block shows a complete example of using the xOpera SaaS API through curl:
csar_base64="$(base64 --wrap 0 test.csar)"
api="https://saas-xopera.xlab.si/api"
auth_base_url="https://openid-xopera.xlab.si"
secret_base64="$(echo 'hello!' | base64 -)"

your_username=YOUR_USERNAME
your_password=YOUR_PASSWORD

alias cookiecurl="curl -sSL --cookie-jar cookiejar.txt --cookie cookiejar.txt"
response_from_credentials_redirected_to_next_auth="$(cookiecurl $api/secret)"

### login flow - RADON auth ###
redirect_url_to_radonauth="$(echo $response_from_credentials_redirected_to_next_auth | xmllint --html --xpath "string(//a[@id='zocial-keycloak-xlab-oidc-provider-to-keycloak-radon']/@href)" - 2>/dev/null)"
response_radonauth="$(cookiecurl ${auth_base_url}${redirect_url_to_radonauth})"

login_url_radonauth="$(echo $response_radonauth | xmllint --html --xpath "string(//form[@id='kc-form-login']/@action)" - 2>/dev/null)"
cookiecurl "$login_url_radonauth" -d "username=$your_username" -d "password=$your_password" -d credentialId=""
redirect_url="$redirect_url_radonauth"
### end RADON auth login flow ###

### login flow - internal auth ###
redirect_url_internal="$(echo $response_from_credentials_redirected_to_next_auth | xmllint --html --xpath "string(//form[@id='kc-form-login']/@action)" - 2>/dev/null)"
redirect_url="$redirect_url_internal"
### end internal auth login flow ###

# final login step, sets cookies and automatically completes the /secret request
cookiecurl "$redirect_url" -d "username=$your_username" -d "password=$your_password" -d credentialId=""

# xopera-saas requires you to be mindful
cookiecurl "$api/auth/consent" -XPOST -d "{\"iAcknowledgePotentialDataLossAndAmAwareOfAllRisks\": true}"

# normal usage
cookiecurl "$api/secret"
cookiecurl "$api/secret" -XPOST -d "{\"name\": \"credential1\", \"path\": \"/tmp/credential.txt\", \"contents\": \"$secret_base64\"}"
cookiecurl "$api/secret"
cookiecurl "$api/secret/1"
cookiecurl "$api/workspace"
cookiecurl "$api/workspace" -XPOST -d '{"name": "workspace1"}'
cookiecurl "$api/workspace/1/secret/1" -XPUT
cookiecurl "$api/workspace/1/secret"
cookiecurl "$api/secret/1"
cookiecurl "$api/workspace/1"
cookiecurl "$api/workspace/1/project" -XPOST -d "{\"name\": \"myproject\", \"csar\": \"$csar_base64\"}"
cookiecurl "$api/workspace/1/project"
cookiecurl "$api/workspace/1"
cookiecurl "$api/workspace/1/project/1/creationStatus"
cookiecurl "$api/workspace/1/project/1/debugPackage"

# interaction with the project (identical to xopera-api), instructions copied from there
project_url="$api/workspace/1/project/1"
cookiecurl "$project_url/status"
cookiecurl "$project_url/validate" -XPOST -H "Content-Type: application/json" -d @inputs-request.json
cookiecurl "$project_url/deploy" -XPOST -H "Content-Type: application/json" -d @inputs-request.json
cookiecurl "$project_url/status" | jq
cookiecurl "$project_url/outputs"
cookiecurl "$project_url/undeploy" -XPOST
For further interaction with each project, see the xopera-api specification
Eclipse Che/VS Code plugin for xOpera SaaS
The SaaS orchestrator has also Eclipse Che (Eclipse Theia) and Visual Studio Code plugin that provides the ability to create and run deployment projects created inside the SaaS orchestrator.
The xOpera SaaS plugin is available on Open VSX Registry and VS Marketplace. The code can also be explored in xopera-saas-vscode-plugin GitHub repository.
There are currently two commands that can be invoked from the explorer Eclipse Che Theia/Visual Studio Code context. These are:
xOpera SaaS: Create project from CSARxOpera SaaS: Delete login info
The authentication to the SaaS component is performed through Keycloak IAM.
This means that when using the SaaS plugin the first time, the user will be prompted to select his preferred way of
logging in.
This can be either through the default Keycloak instance or through any of the connected Keycloak identity providers.
After that the login data will be saved and the user will be able to invoke the plugin commands (if the user would want
to remove his saved login data he could click on the xOpera SaaS: Delete login info option).
The main command is xOpera SaaS: Create project from CSAR. By invoking this, the plugin currently allows users to:
create a new workspace
create a new project in a new or existing workspace
deploy a project
The functions through the plugin are a bit limited, as it is more convenient than other actions are performed through the Opera SaaS web interface.
Most operations can be performed directly from an Eclipse Che/Visual Studio Code plugin.
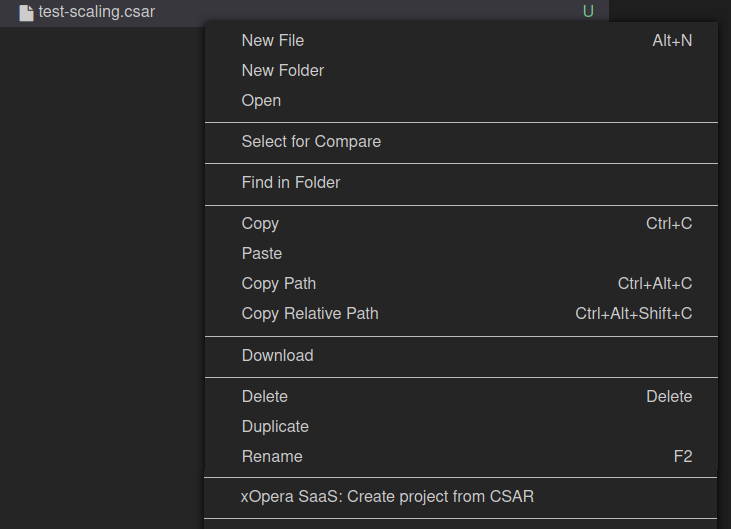
Fig. 7 The file selector, activated on CSAR files.
User can invoke the main plugin actions by right clicking on the compressed TOSCA CSAR (file should include .zip or .csar extension). Then the plugin will interactively guide him through the creation of workspace and the project.
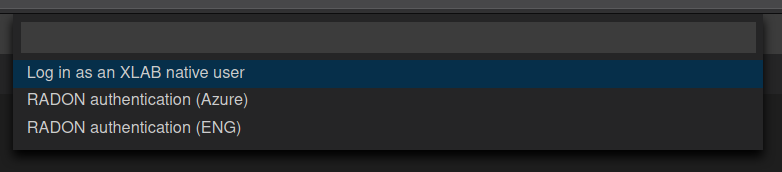
Fig. 8 The Che plugin login dialog.
Upon logging in, you are presented with a choice of workspaces, where you can decide between using a new workspace or choosing an existing one. After that, you enter the name of the project, and CSAR upload and project creation begins.
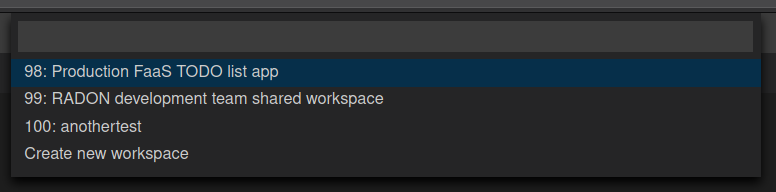
Fig. 9 Che plugin workspace selection.

Fig. 10 Enter your project name in this dialog.
Project creation progress is shown in the bottom right corner along with all other Che notifications.
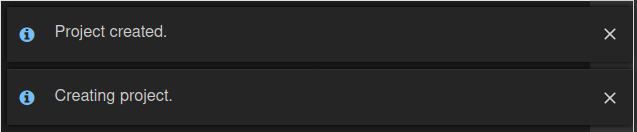
Fig. 11 The start and finish notifications for project creation.
As a final step, you can choose to deploy the project immediately, or postpone it.

Fig. 12 Choose whether or not to deploy the new project immediately.
Finally, you are redirected to the xOpera SaaS dashboard for finer control over your project.

Fig. 13 Choose whether or not to deploy the new project immediately.
In the following video we present the xOpera SaaS and show how to use it through the Eclipse Che.
Warnings about your secrets and general security
Your secrets - not for xOpera SaaS, but those you add for services you access in CSARs etc - are stored in plaintext on the server xOpera SaaS is running on, and retrieved on request. This is necessary for the execution of your orchestration actions.
All user interfaces of xOpera SaaS include a consent barrier that you must agree to in order to use the software.
You need to use caution with the secrets you submit and with whom you share your workspaces.
Users you share workspaces with do not get direct access to secrets. All projects created under the workspace have access to them, and, as users have control of the filesystem, they can also access the secrets by deploying a CSAR.
If you request xOpera SaaS server administrators to help you or access your project, they will also be in a position to access the secrets. Whenever possible, use temporary secrets with limited access to the smallest required set of capabilities to improve your security.